How to Connect a Shopify Store as a Supplier

STEP 1 – Log in to your Smoke Drop App Account


To proceed, please log in to your Smoke Drop app account at wholesale.thesmokedrop.com

Please use the credentials you used when you signed up. 

STEP 2 – Activate Subscription

1. Hover your mouse on your company/profile name located at the top right corner and click “Account”.

2. Click “Subscriptions” under the Billing section located on the left hand side.

3. Select the plan, add a card and activate the subscription.

STEP 3 – Create Shipping Methods

1. Click “General” under the Shipping Methods section on the left part of the Account page. Click here for more information on how to set up your shipping profile.

STEP 4 – Connect your Shopify Store To The App

A. Create a custom app, go to Shopify and click Apps.

B. Then, click “App and sales channel settings”.

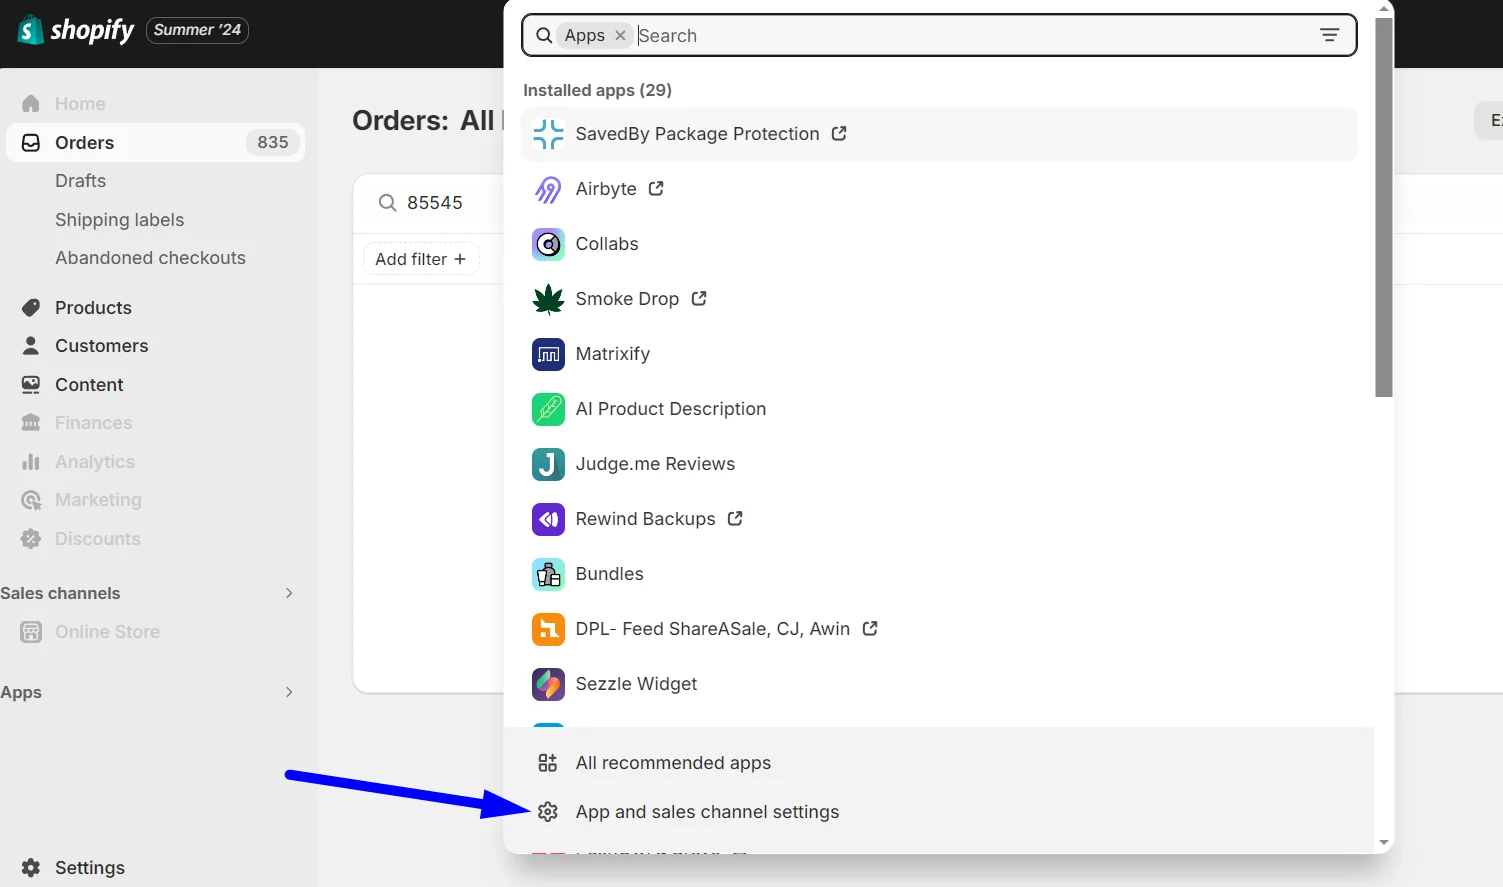
C. Click “Develop apps”.

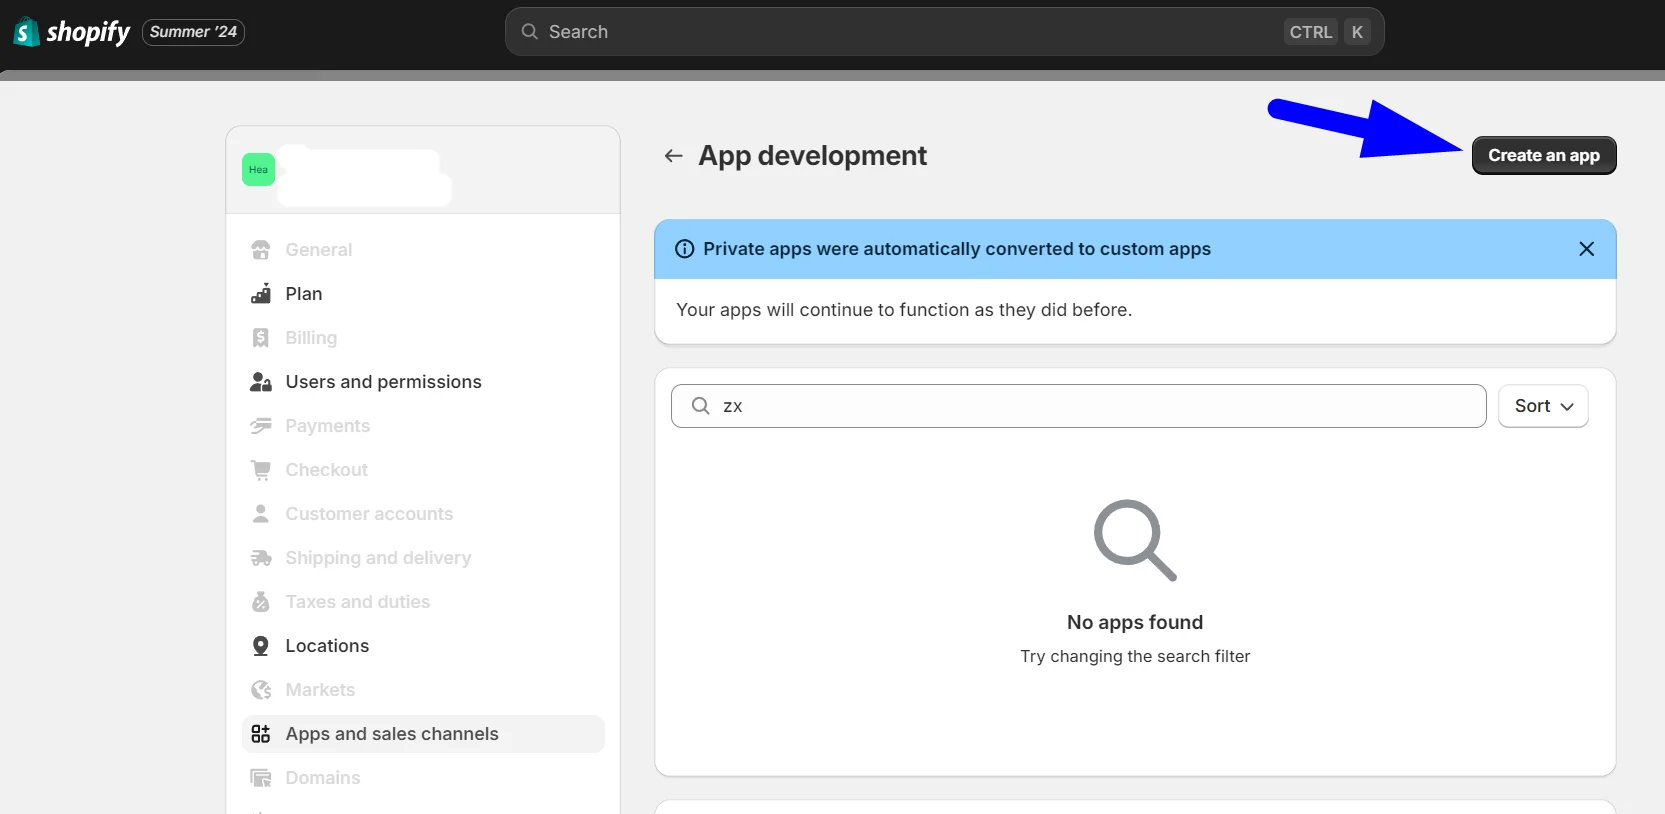
D. Click “Create an app”.

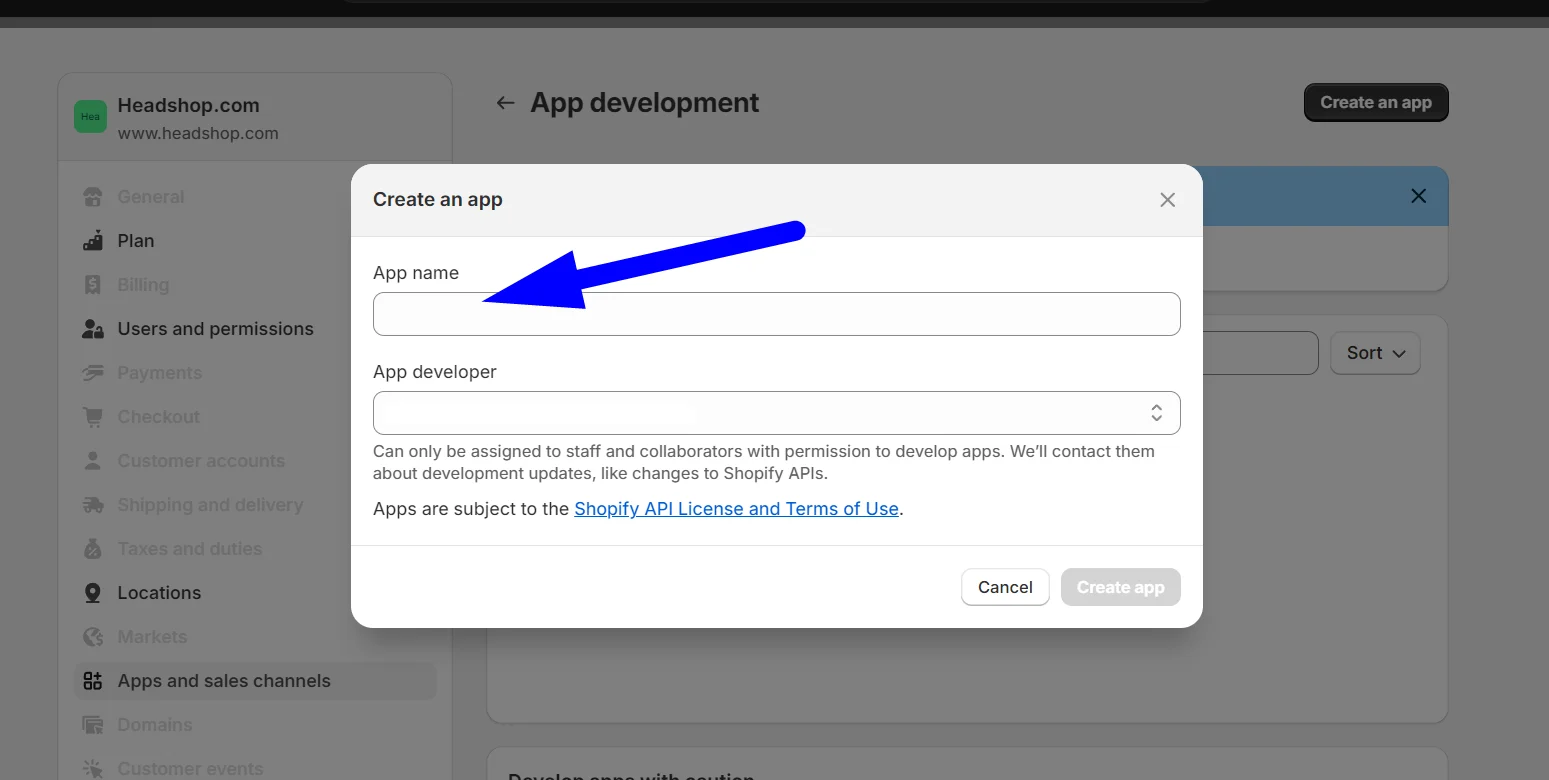
E. Name the app as “Smoke Drop App”.

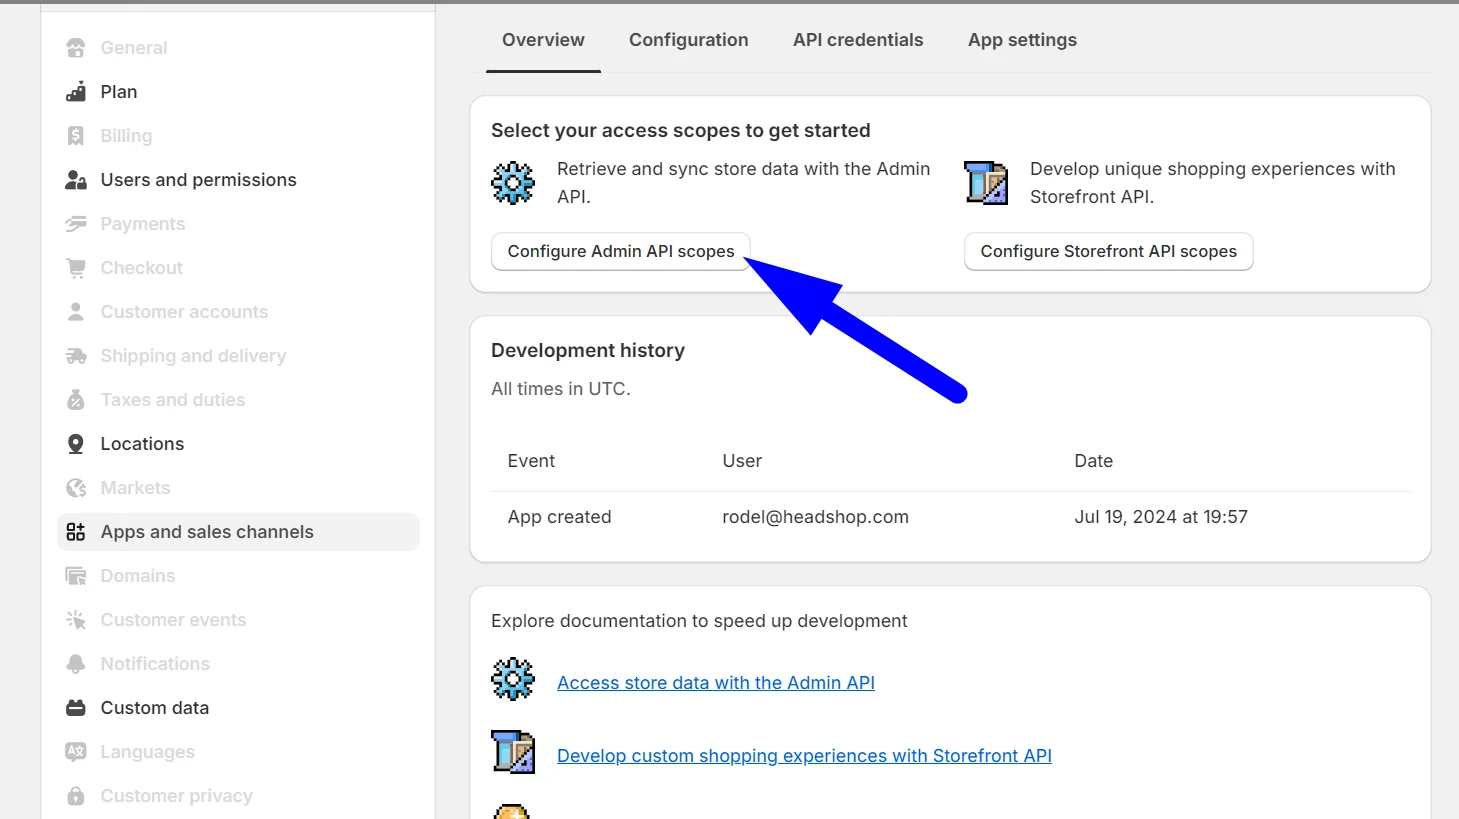
F. Click “Configure Admin API Scopes”.

G. In the Admin API access scopes section, select the following API scopes:
  1. Assigned fulfillment orders – Read and write
  2. Customers – Read and write
  3. Draft orders – Read and write
  4. Fulfillment services – Read and write
  5. Inventory – Read and write
  6. Locations – Read 
  7. Merchant-managed fulfillment orders – Read and write
  8. Order editing – Read and write
  9. Orders – Read and write
  10. Product listings – Read and write
  11. Products – Read and write
  12. Shipping – Read and write
  13. Third-party fulfillment orders – Read and write
  14. When you’re done, click Save.

H. Install the app and get the API access tokens

1. Click Install app.
2. In the overview tab window, click Install app.

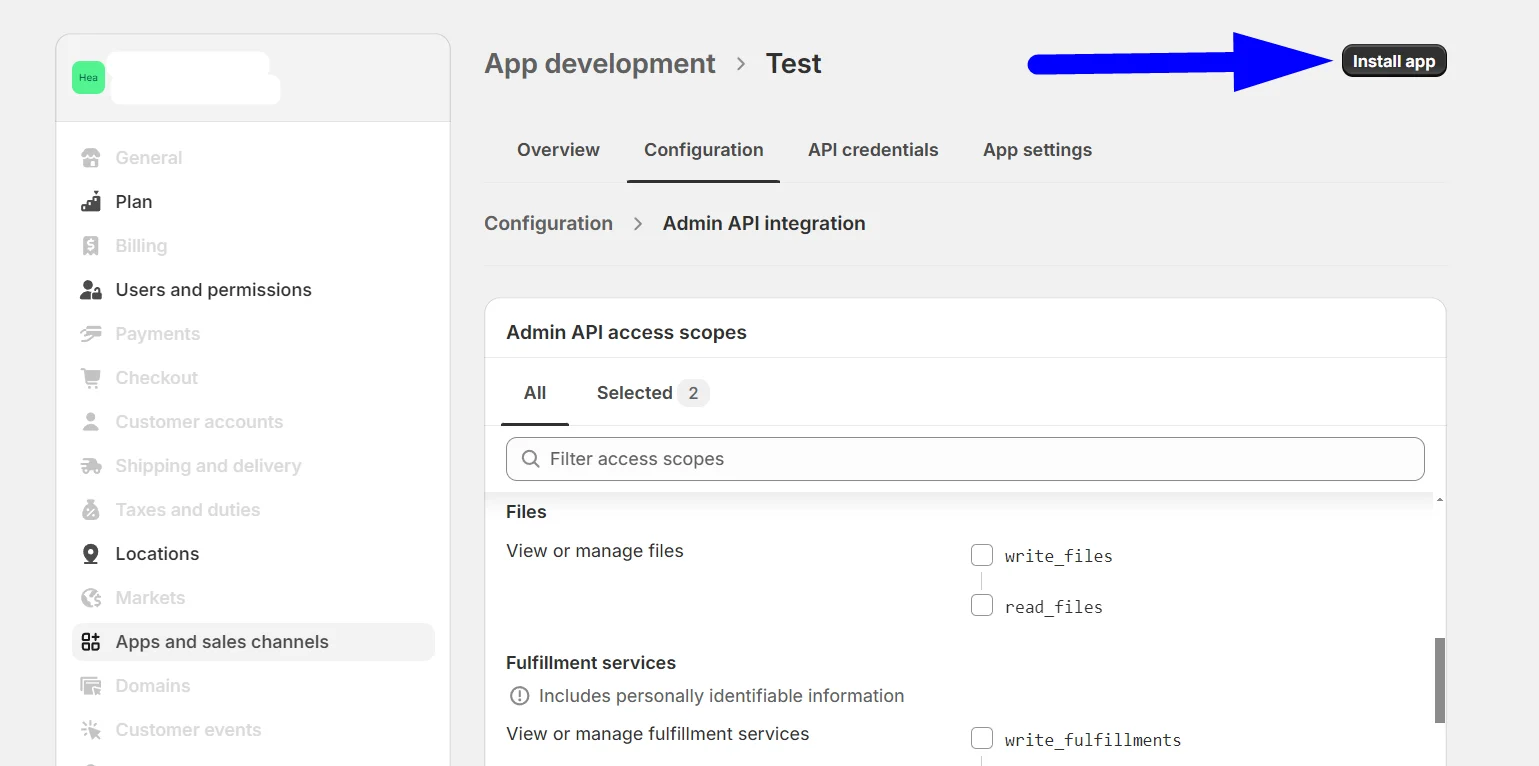
I. Go to the Admin API access token section and click the “Reveal token once”. You can see the Admin API access token on this page only one time, because the token provides API access to sensitive store data. After revealing the access token, write down or record the token somewhere secure so that you can enter it into your app account.

J. Add custom app credentials to your app account
    1. Log in to your app account – wholesale.thesmokedrop.com

    2. From the homepage, go to Account

    3. Select General under Integrations

    4. Select Shopify

    5. Enter your store name

    6. Enter your .myshopify.com URL

      1. This can be located using the URL from your Shopify admin

      2. Do not include ‘https://’ or ‘www.’

      3. Must end in ‘.myshopify.com

      4. Example – my-store.myshopify.com

    7. Enter your Admin API access token

    8. Select Save

    9. You’ve successfully connected your Shopify store


STEP 5 – Set up Integration Settings for Product Import

Before proceeding, here are some important terms we want you to understand:
 
App refers to our platform or marketplace where you can manage all the products imported from your Shopify store.
 
Cost (Base Cost): This refers to the price of the product or the amount we will pay you for the product.
 
MSRP (Manufacturer’s Suggested Retail Price): This is the price you recommend for us or retailers to advertise the product.
 
MAP (Minimum Allowable Price): This represents the minimum price you allow us/retailers to sell the product for.
Before importing your products, please follow these guidelines and ensure that the following information, if applicable, is available in your Shopify products:
Consumable products
  1. For consumable products, make sure a Certificate of Analysis (Lab Report) was issued within the current year or the past 12 months.


  2. Include a direct link to the Certificate of Analysis (COA/Lab report) in PDF format for every product in the product description.
  3. Ensure an ingredient panel image is included for every product in the product images.
Shipping Times
Inventory should be located within the US and ensure orders can be shipped within 48 hours (2 business days) of being placed.
 
Remove External Links in Product Descriptions
Remove any links to external websites in product descriptions that redirect customers to make purchases elsewhere.  Only Lab Reports / Certificatite of (Go to Products>Catalog)
 
If you need to keep URL links in Shopify but remove them from the app catalog, please ensure “Description” is deselected on the Integration page before updating the product description. This prevents the product description in the app from being overwritten.
 
All products need weight and dimensions
Make sure all products specify weight and dimensions, or at least weight, in your Shopify store. If products have weights and dimensions in Shopify, they will be included in the product sync.
 
Products in your Shopify store need proper tags
Ensure products in your Shopify store have proper product tags. You can also update this in the app catalog page after the products are imported.
 
You can select which items you want to sync from your store to the app by adjusting the options in the Integration Settings.

Here are some other important things to do and remember:
 
7. Refrain from including promotional materials or wholesale pricing inside packages when shipping orders.
 
8. The MSRP should not exceed the price advertised in your store.
 
9. Inform us before making any changes to products in your Shopify store that will affect your products in the app’s catalog, such as updating product information, adding variants, changing pricing, updating product descriptions, or any other details. If any changes are made, please inform us so we can notify retailers who have imported your products for sale in their stores.
 
Setup Cost Multiplier For Product Import
 
The pricing you will see in each of your imported products are the following: Cost, MSRP and MAP (Explained above).
 
Once you’ve connected your store to the App Marketplace (as outlined in STEP 4 – Connect your Shopify Store to the app), you’ll have access to the Integration Settings on your app account. Here, you can configure settings such as Cost, MAP, MSRP, and other product information. These multipliers will be applied to all your products when imported. 
Please ensure that you set the correct COST, MSRP, and MAP multipliers as intended. Once you save your multipliers and other settings, this action is final. Saving will initiate the product import process with the applied COST, MSRP, and MAP multipliers.
 
To begin, please navigate to the Account/My Account page in the app. Then, find Integrations and choose General.
 
The formula used in the integration page is Shopify Price x Multiplier.
 
For example, if a product is listed at $10 in your Shopify store and you’ve entered a Cost Multiplier value of 0.45 for (55% price margin), the Wholesale Cost would be calculated as follows:
 
Wholesale Cost = Selling Price in Shopify × Cost Multiplier
Wholesale Cost = $10 × 0.45
Wholesale Cost = $4.5
When the product is imported, the Base Cost would be $4.5.
 
Most Shopify suppliers keep the MSRP and MAP multipliers set to 1 so the MSRP and MAP match the prices in their stores. Therefore, a product that costs us $4.5 will have a Manufacturer’s Suggested Retail Price (MSRP) of $10. While this minimum profit margin serves as a starting point, providing a higher profit margin enhances the likelihood of retailers successfully selling your products, and for you to succeed on our marketplace.
 
Once you hit SAVE on the Integration Page, it should start importing your products into the app. Please allow up to 1 hour.

Product Catalog in the app

Once your products are imported, they’ll be under the Catalog page and in draft status (draft means not published) so you can review and update them before publishing. Go to app Products and click Catalog.
 
Then you can individually update the product information by clicking “Edit” allowing you to manually update the COST, MSRP, and MAP. Please note that your product’s Basic Information, Images, Weight & Dimensions, and Identifiers (SKU) & Inventory are automatically synced from your Shopify store to your catalog in the app. Even if you update it on the app catalog page, the information in your Shopify store will always overwrite it. However, you may update your Integration settings and uncheck the ones you don’t want to sync automatically.


Override Settings for Product With Multiple Variants

Please take the time to thoroughly review your products, especially their pricing. If your products have variants with different pricing, please ensure to check the Overrides settings in the “Variants” section under “Advanced Settings” for each product. Each product variant has its own Override settings, where you can specify the price, weight, dimensions, and shipping method as needed. Please watch this 
Video

 
Publishing Your Products 
  1. Login to your app.
  2. Click on Products, then select Catalog.
  3. To select products for publishing, check the box before the product names. You can select multiple products per page.
  4. From the “Actions” dropdown menu, choose “Publish Products”. Your published products will now be under the Active status (Active means product is published). 
Once a product is published, retailers will be able to import and publish your products in their stores. It is important NOT to make any changes to your products once they are published, as any modifications will not be reflected on the retailers’ websites. 

If you absolutely need to update your products, please promptly inform us about any of the following so we can provide updates to retailers:
  1. Discontinuing/unpublishing any products. Make sure the inventory is set to 0 in your Shopify store so it will sync to all retailers and prevent any orders. Do not change Active products to Draft. 
  2. Adding new products/variants.
  3. Make edits anywhere in the product information (Update pricing, product description, etc.)
Please contact us once you’re done so we can do a final review.
Scroll to Top